
Finding Stress Relief in Yoga
- Ella B

- Aug 10, 2023
- 6 min read
Updated: Jun 11, 2025
I will be one of the first to say that yoga can be super hard, and stress inducing rather than stress relieving. I say this because when you first start doing yoga, you are made to feel like you have to be able to bend in the same way that the instructors do. Keep in mind, though, that those instructors have likely been doing yoga for years and therefore are more flexible than someone who is just starting out. I have been a dancer for years, and even my flexibility didn't match the instructor's. I also take into consideration that I was seven months pregnant the first time I tried yoga, so I was already frustrated.
However, yoga truly can be a great stress reliever when done properly. After my pregnancy, I tried yoga again and it was very relaxing. Since I had decided to jump in without proper preparation, I figured the first thing I should do is give you proper tips for beginners; especially for those who choose not to take an actual class and just do it from home. Tips for First Time 1. Start Slowly
Begin with shorter sessions and gradually increase the duration as you become more comfortable. I would highly suggest starting with a couple poses for no more than about ten minutes. Most yoga sessions for those who are more experienced will last about an hour. Without having done yoga before, you will get extremely tired and sore quickly and want to give up; remember I have done this to myself before.
2. Listen to Your Body
Pay attention to how your body feels in each pose. Don't force anything and avoid pushing yourself too hard. If you've ever stretched for sports before, you will know exactly how this feels. You may start to feel a burning in your muscles; if this happens go back to the position you were in just before the burning started. Maybe you were bending over and at first your hands were roughly at your knees, but you bent further and there's a burning sensation: pull back up to where your hands were at your knees! If not, you may actually strain your muscles and be in a lot of pain. Yoga is not about pain; it is about relaxation.
3. Use Props
Props like blocks, straps, and bolsters can help you achieve proper alignment and make poses more accessible. Most people just begin with using a mat. However, if you are starting this while pregnant, I would definitely suggest a ball at the most as it can be hard to get up and down when you feel like a whale. (I remember at six months with my youngest crying one day for no reason except that I genuinely felt like a beached whale; pregnancy hormones suck.)
4. Practice Regularly
Just like everything else in life, consistency is key. Aiming for a few minutes of practice every day or a longer session a few times a week will help with this. If you choose to go with a few minutes every day, I suggest not doing more than one or two poses at a time as you build yourself up. Start with a pose for a few minutes, and then every couple of days add a new pose. If you go with a couple times a week, start with two poses and build up from there.
5. Warm-Up
Always warm up your body with gentle movements before diving into more intense poses. This can be something as small as standing with your feet shoulder width apart, and just gently rocking side-to-side; or even doing "jelly arms" for a minute to loosen up the muscles.
6. Breathe
Focus on deep, steady breathing throughout your practice. Your breath helps you stay present and calm. Breathing steady can be difficult for most people, as some can't figure out how to concentrate to get even breaths every time. I hate saying it, but those who have anxiety or even PTSD can figure this part out very easy because we have certain steps to our breathing that we have to take to calm down and recenter our brains. The best way to do it, is to take a deep breath through your nose and hold for five seconds before breathing out through your mouth while counting to five in your head. This creates a steady and easily repetitive pattern that will put you into a calm and relaxed state.
7. Stay Hydrated
By now you're probably getting used to me saying this, especially since we are currently in summer, and water is very important. Drinking plenty of water before and after your practice to keep yourself hydrated is very similar to doing it when you're working out. Yoga is a form of working out or cooling off after a workout and it can be just as unhealthy to not drink a good amount of water as it would be if you did a power workout.
8. Find a Good Instructor
While this is not always feasible, there are different ways to do this if you choose to. For instance, if you are able to you could consider taking a beginner's yoga class at a local gym or following online videos led by experienced instructors. Another option if you want to use a video is going and buying the DVDs that they sell in the workout areas of stores like Walmart and Target. They're very much on the inexpensive side, at most I believe I have paid $8 in the past. A very popular name many of you might recognize is Jillian Michaels. She has had many workout DVDs over the years, and also has a few for yoga as well. Beginner-friendly Poses
Obviously, not everyone can afford to go to a class or pay for a DVD to learn how what to do. Sometimes you can't find the right videos on YouTube, or the instructions are frustrating. I have gone and found a few beginner-friendly poses; this way you can even try them out yourself before you go investing in things for yoga, whether it's an actual mat, or a DVD or class membership.

1. Mountain Pose (Tadasana):
Stand with your feet hip-width apart and arms at your sides.
Engage your core, lengthen your spine, and relax your shoulders.
Focus on your breath and grounding through your feet.
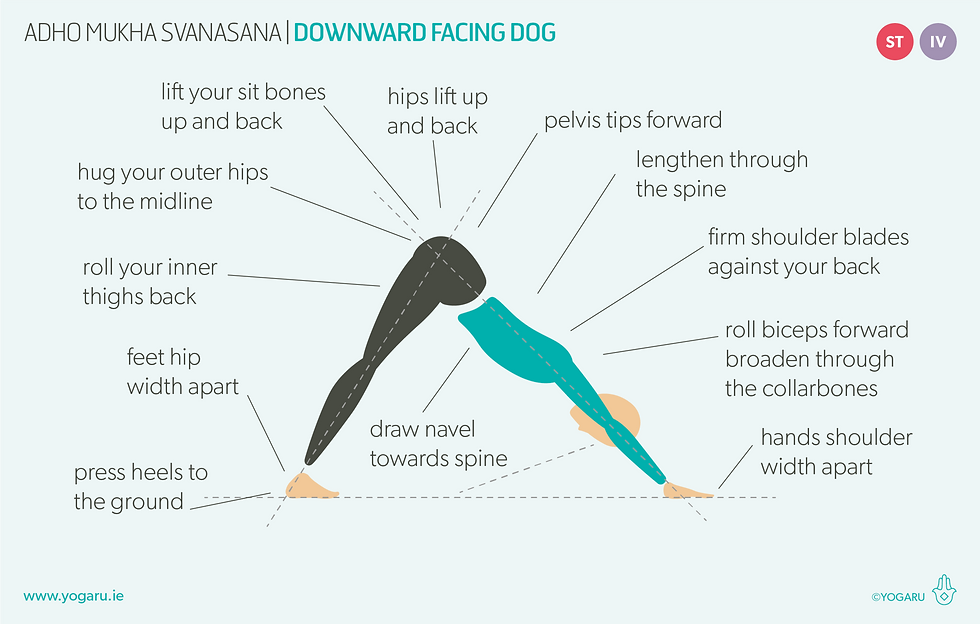
2. Downward Facing Dog (Adho Mukha Svanasana):
Start on your hands and knees, then lift your hips up and back.
Form an inverted V-shape with your body, pressing your heels toward the floor.
Relax your neck and let your head hang between your arms.

3. Child's Pose (Balasana):
Kneel on the floor and sit back on your heels.
Fold forward, extending your arms in front of you and resting your forehead on the mat.
Relax and breathe deeply.

4. Cat-Cow Pose (Marjaryasana-Bitilasana):
Begin on your hands and knees.
Inhale, arch your back, lift your tailbone, and look up (Cow Pose).
Exhale, round your spine, tuck your chin to your chest, and tuck your tailbone (Cat Pose).
Move between these two poses, syncing your breath with the movement.

5. Warrior I (Virabhadrasana I):
Step one foot forward into a lunge position.
Bend your front knee, keeping it aligned with your ankle, and extend your back leg straight.
Lift your arms overhead, palms facing each other, and gaze forward.
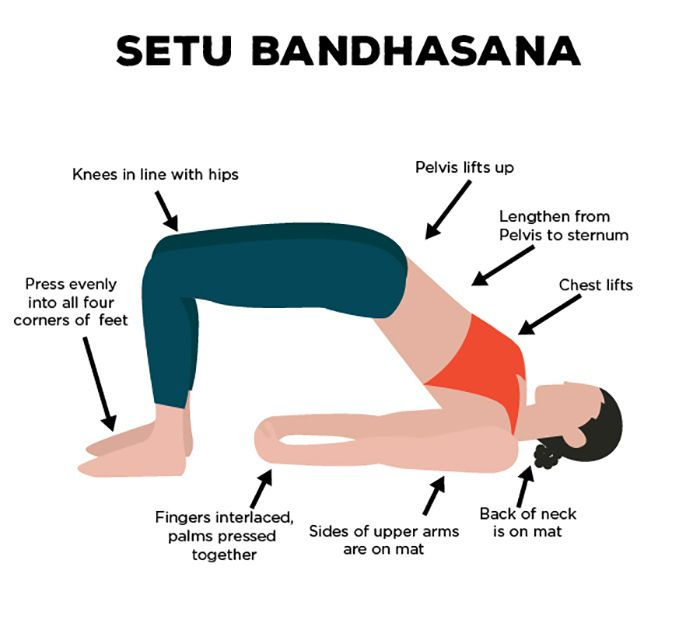
6. Bridge Pose (Setu Bandhasana):
Lie on your back with your knees bent and feet hip-width apart.
Press into your feet to lift your hips off the ground while keeping your shoulders and head on the mat.
Interlace your fingers under your hips and gently roll your shoulders underneath you.

7. Corpse Pose (Savasana):
Lie flat on your back with your arms and legs comfortably spread.
Close your eyes and allow your body to relax completely.
Focus on your breath and let go of any tension.
All of these images were found just googling the pose and come from all over. But they do help you understand how each pose is supposed to look and how you are supposed to feel with them.
I hope this has been a helpful guide to starting your yoga journey. Remember that Yoga is supposed to help, not hurt; and drink plenty of water! Until next time, friends!


Comments